A Quick Guide: How to Mask in Davinci Resolve
Masking in DaVinci Resolve allows you to isolate and modify specific areas of your video footage. Here's a step-by-step guide on how to use masking in DaVinci Resolve.
Note: (Apologies for some of the GIFs…in Davinci Resolve the mask is near perfect around the subject. The GIF was exported in an odd color format resulting in faulty coloring.)
Step 1: Import Your Footage
Open DaVinci Resolve and create a new project. Import the footage you want to work with into the Media Pool.

Step 2: Create a New Timeline
Drag your footage from the Media Pool to the timeline at the bottom of the interface. This creates a new timeline where you'll edit your video.

Step 3: Go to the Color Page
Click on the "Color" tab at the bottom of the screen to switch to the Color page, where you'll perform color grading and masking.

Step 4: Add a New Node
Nodes are used for various color grading and effects. Right-click on the selected clip and choose "Add Node" > "Add Serial." This creates a new node for your adjustments.

Step 6: Click the magic mask panel
Drag your cursor over the magic mask icon and click to bring up the magic mask panel. This panel is where you'll create and adjust your mask.

Step 7: Click and Drag Qualifier (dropper + icon)
Click the Qualifier (Dropper + icon). Scroll over the object you’d like to mask.

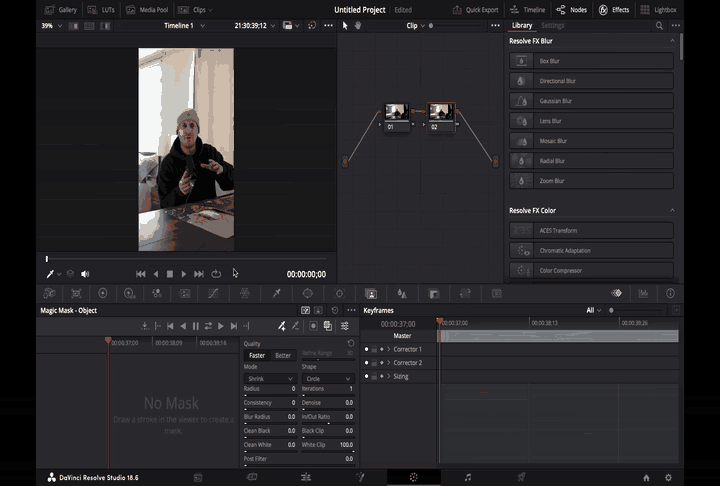
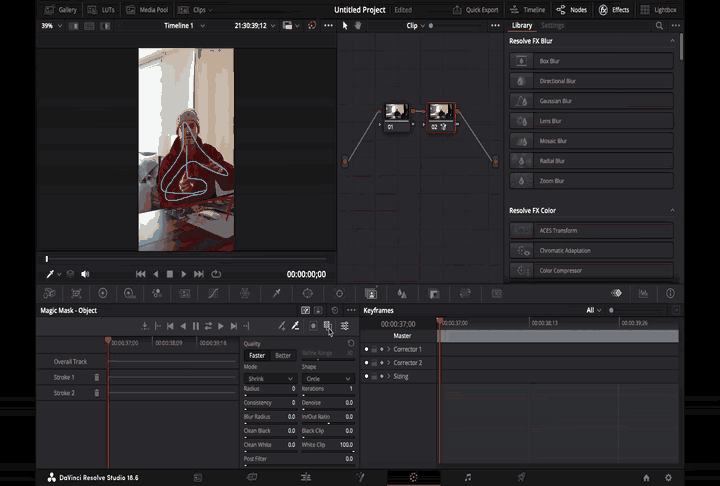
Step 8: Draw Your Mask
Use this tool or any other masking tool to draw the mask around the area you want to isolate. You can refine the mask by adjusting control points and bezier handles. Click and drag a line over your object. Davinci Resolve does a fairly good job outlining the object with just a few lines.
Step 9: Adjust Mask Properties
If you have spillage in other areas, you can click the (Dropper -) tool to draw a red line on areas that you don’t want to include in your mask.

Step 10: Apply Corrections
Once your mask is ready, click the Split Screen viewer below to view your mask, and make any necessary corrections.

Step 11: Last Adjustments
Make sure you click ‘Better’ to add a more accurate refinement to your mask.
Step 12: Before tracking…
Make sure to drag your play head at the beginning of your clip so that the object is masked throughout the entire clip.

Step 13: Start Tracking
Notice the mouse above the tracking icon in between the pause and play icon. Click track so Davinci Resolve can track your object mask.

Step 14: Add an alpha node
Lastly, toggel your mouse in the node area, Right Click, and click “Add Alpha Node”. Then, connect the blue arrow on the node as pictured and connect it to the other blue ‘Alpha Output’

Step 15: Double Check your mask
You did it! Now click the icon below to see your mask! Have fun and keep creating!

Additional Tips:
You can add multiple nodes for different masks or adjustments.
Experiment with different masking tools and controls for more precise results.
Utilize keyframes if you need the mask to change over time.

Author: Dan Costa
Hey I’m Dan, a passionate travel photographer on a relentless quest to capture the world's beauty one frame at a time. With a deep love for exploring new cultures and landscapes, I've embarked on countless adventures across the world armed with my camera and an unquenchable thirst for unique moments. Through my lens, I aim to tell compelling stories, evoke emotions, and inspire wanderlust in others. Join me on this visual journey as we explore the world's wonders together! Keep Creating! 📸
Related Posts
But Wait There’s More!
For more blog posts on Photography, Editing, Travel and more, check in weekly and don’t forget to throw a follow on Instagram if you like Travel Photography and becoming a better creative! Catch you in the next one!
Keep Creating 📸,
Costa